Líderes
Conteúdo Popular
Exibindo conteúdo com a maior reputação em 05-02-2018 em todas áreas
-

lg k10 m320tv FRP
Iuri Donada e um outro reagiu a rodrigo soares por um tópico
Qualquer coisa troca o cabo USB!2 pontos -

Atualizações Uni-Android Tool
Reginaldo almeida e um outro reagiu a Wellington Maciel™ por um tópico
Uni-Android Tool [UAT] Version 14.02 Released DOWNLOAD AQUI2 pontos -

Motorola E4 Plus XT1773 reiniciando
Ivan kern nunes reagiu a Claudio Neto por um tópico
no spflastools ja fez format+all1 ponto -

lg k10 m320tv FRP
Reginaldo almeida reagiu a Dr.Software por um tópico
só aplica rom do clansoft e depois reset frp que vai que vai :D1 ponto -
Moto G4 Plus Não reconhece Os Dados !
jefffalcao reagiu a Claudio Neto por um tópico
ja tentou colocar fastboot ele e reconhecido no PC ? senao vai ser problema de conector mesmo. trilha, ci de cargo algo parecido.1 ponto -

Alcatel A3 XL (9008j) FRP 7.0?
Reginaldo almeida reagiu a Relampago por um tópico
Celular desligado.1 ponto -

Atualização Ultimate Multi Tool - UMT Box
Bruno Santana reagiu a Reginaldo almeida por um tópico
UMTv2 UMTPro QcFire v1.7 Setup https://drive.google.com/file/d/10iiAx-eDHLiPc-J4EYFXpYgk-CRFDS-J/view?usp=sharing1 ponto -

Procedimentos realizados com Infinity box
Reginaldo almeida reagiu a Cristiano de Moraes por um tópico
Reset FRP S090q BLU Wait for phone... Phone found! [ 4 ] Sync... Inital Boot Ok! BB_CPU_PID : 6580 BB_CPU_NME : [MediaTek] MT6580_S00 BB_CPU_EXT : 0xCA00 , 0x8A00 , 0x0000 Processing BROM stage Settings for BROM configured! SecCfgVal : 0x00000000 BromVer : 0x00FF BLVersion : 0x0001 PreLoader : Active [ Boot with PL ] BootLdrSS : NORMAL with PRELOADER Processing DA stage DA Select done, will use MTK_AllInOne_DA_v5.1624.16.07 Sending and initialize DA ... Running DA ver.4.2 on BBID : 0x94 NAND Flash : NOT INSTALLED eMMC Flash : 700100563130303038501EA8DAB62387 Initialize Memory ... DRAM already initialized by Preloader DAgent sent , init HW now eMMC FlashIC initialized [eMMC] : FLASH_VEN : 0x70 , OEM : 0100 [eMMC] : FLASH_INF : [KINGSTON] , 80001 [eMMC] : FLASH_CID : 700100563130303038501EA8DAB62387 [eMMC] : FLASH_BRT : 0x00400000 , 0x00400000 , 0x00400000 [eMMC] : FLASH_LEN : 0x00000001C3000000 [eMMC] : FLASH_UCP : 7216 MiB [eMMC 8 GiB] DEV RID : 0xD60D5CD875B806F55ECD674D055BF7E7 INT RAM : 0x00020000 EXT RAM : 0x40000000 [1 GiB] BOOT TYPE : EMMC_FLASH_BOOT SOC VERIFY : C1 Boot Ok! Clear FRP ( Google Reset Protection ) Clear Ok! Done! Elapsed: 00:00:15 Reconnect Power/Cable!1 ponto -
.thumb.jpg.8dd04ad3709a52d74311340222b926b5.jpg)
Falcon AIO All in One Download all New Setups
Reginaldo almeida reagiu a ThiAugust por um tópico
Só atualizando, agora consegui... havia entendido de forma errada a explicação, tem que instalar todos os módulos atualizados e após instalados, abrir cada um separadamente primeiro, ae sim após que todos foram abertos e feito os login, ae sim da pra abrir no AIO all in One.! Vlw amigo1 ponto -
Instaladores para Firmwares Motorola
Suporte Cell Oficial reagiu a Cristiano de Moraes por um tópico
Instalador Moto g4 - XT1626, XT1640 - Android 7.0 Instalador Moto G4 Android 7.0.zip1 ponto -

Remover conta FRP S8 e S8+ SM-G950F/ SM-G955F
Reginaldo almeida reagiu a jose araujo por um tópico
refiz todo o procedimento usando Odin Odin 3.12.3 deu certo 100%1 ponto -

Procedimentos realizados com Sucesso com UMT !!!
joaosk8 reagiu a Bruno Santana por um tópico
D295 e D295F Dead boot repair (no modo qsdload) 100% Operation : Flash Checking for existing devices... Not Found Turn Off phone, hold Vol UP + Vol DOWN and insert USB cable. Found Port : Qualcomm HS-USB QDLoader 9008 (COM21) Driver Info : Qualcomm Incorporated, qcusbser.sys, 2.1.2.2 Connecting to phone... OK Waiting for response... OK Init Handshake Sequence... OK Hardware ID : E1408100 [8610] 00000000 Initializing Protocol... OK Using Auto Selection Preparing Firehose Loader... Done Sending Loader [8610.ufl]... Done Executing Loader... OK Hardware : 8x26, eMMC, 2 GB Warning! High Speed Driver not installed. Please install driver from QcFire\Drivers folder. Payload Info : In: 65536 [4096], Out: 49152, Sector Size: 512 Writing [PrimaryGPT_0.bin] -> [PrimaryGPT] ... Done Writing [modem_8192.bin] -> [modem] ... Done Writing [sbl1_139264.bin] -> [sbl1] ... Done Writing [rpm_141312.bin] -> [rpm] ... Done Writing [tz_142336.bin] -> [tz] ... Done Writing [sdi_143360.bin] -> [sdi] ... Done Writing [aboot_144384.bin] -> [aboot] ... Done Writing [rpmb_148480.bin] -> [rpmb] ... Done Writing [tzb_149504.bin] -> [tzb] ... Done Writing [abootb_150528.bin] -> [abootb] ... Done Writing [persist_204800.bin] -> [persist] ... Done Writing [laf_270336.bin] -> [laf] ... Done Writing [boot_319488.bin] -> [boot] ... Done Writing [recovery_364544.bin] -> [recovery] ... Done Writing [factory_475136.bin] -> [factory] ... Done Writing [sbl1b_581632.bin] -> [sbl1b] ... Done Writing [cust_655360.bin] -> [cust] ... Done Writing [BackupGPT_7633920.bin] -> [BackupGPT] ... Done Applying Patches... Done Resetting device... Done Operation Finished. D295f10d_00.rar D295.rar1 ponto -

G532 Jump Microfone
mozar celulares reagiu a Alisson Tigre por um tópico
 1 ponto
 -
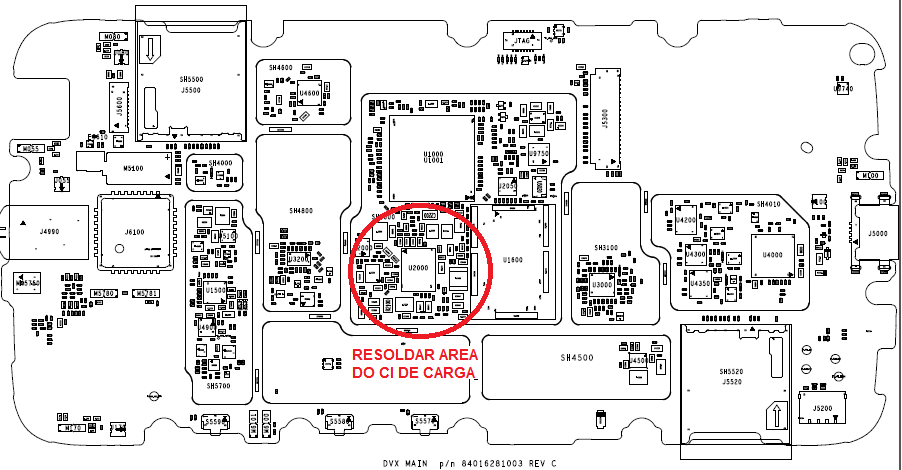
Passei dias com um problema de não carregamento e descarregar ao colocar o carregador. Troquei varios capacitores e diodos do ciruito de carga sem solução. Quando criei coragem e retirei a blindagem, dei uma leve ressolda no CI de carga (U2000) e simples assim o problema foi resolvido. Segue imagem da localização.
 1 ponto
 -

Guia de Reparo Tablets.
PatrickRov reagiu a Ralyson Christian por um tópico
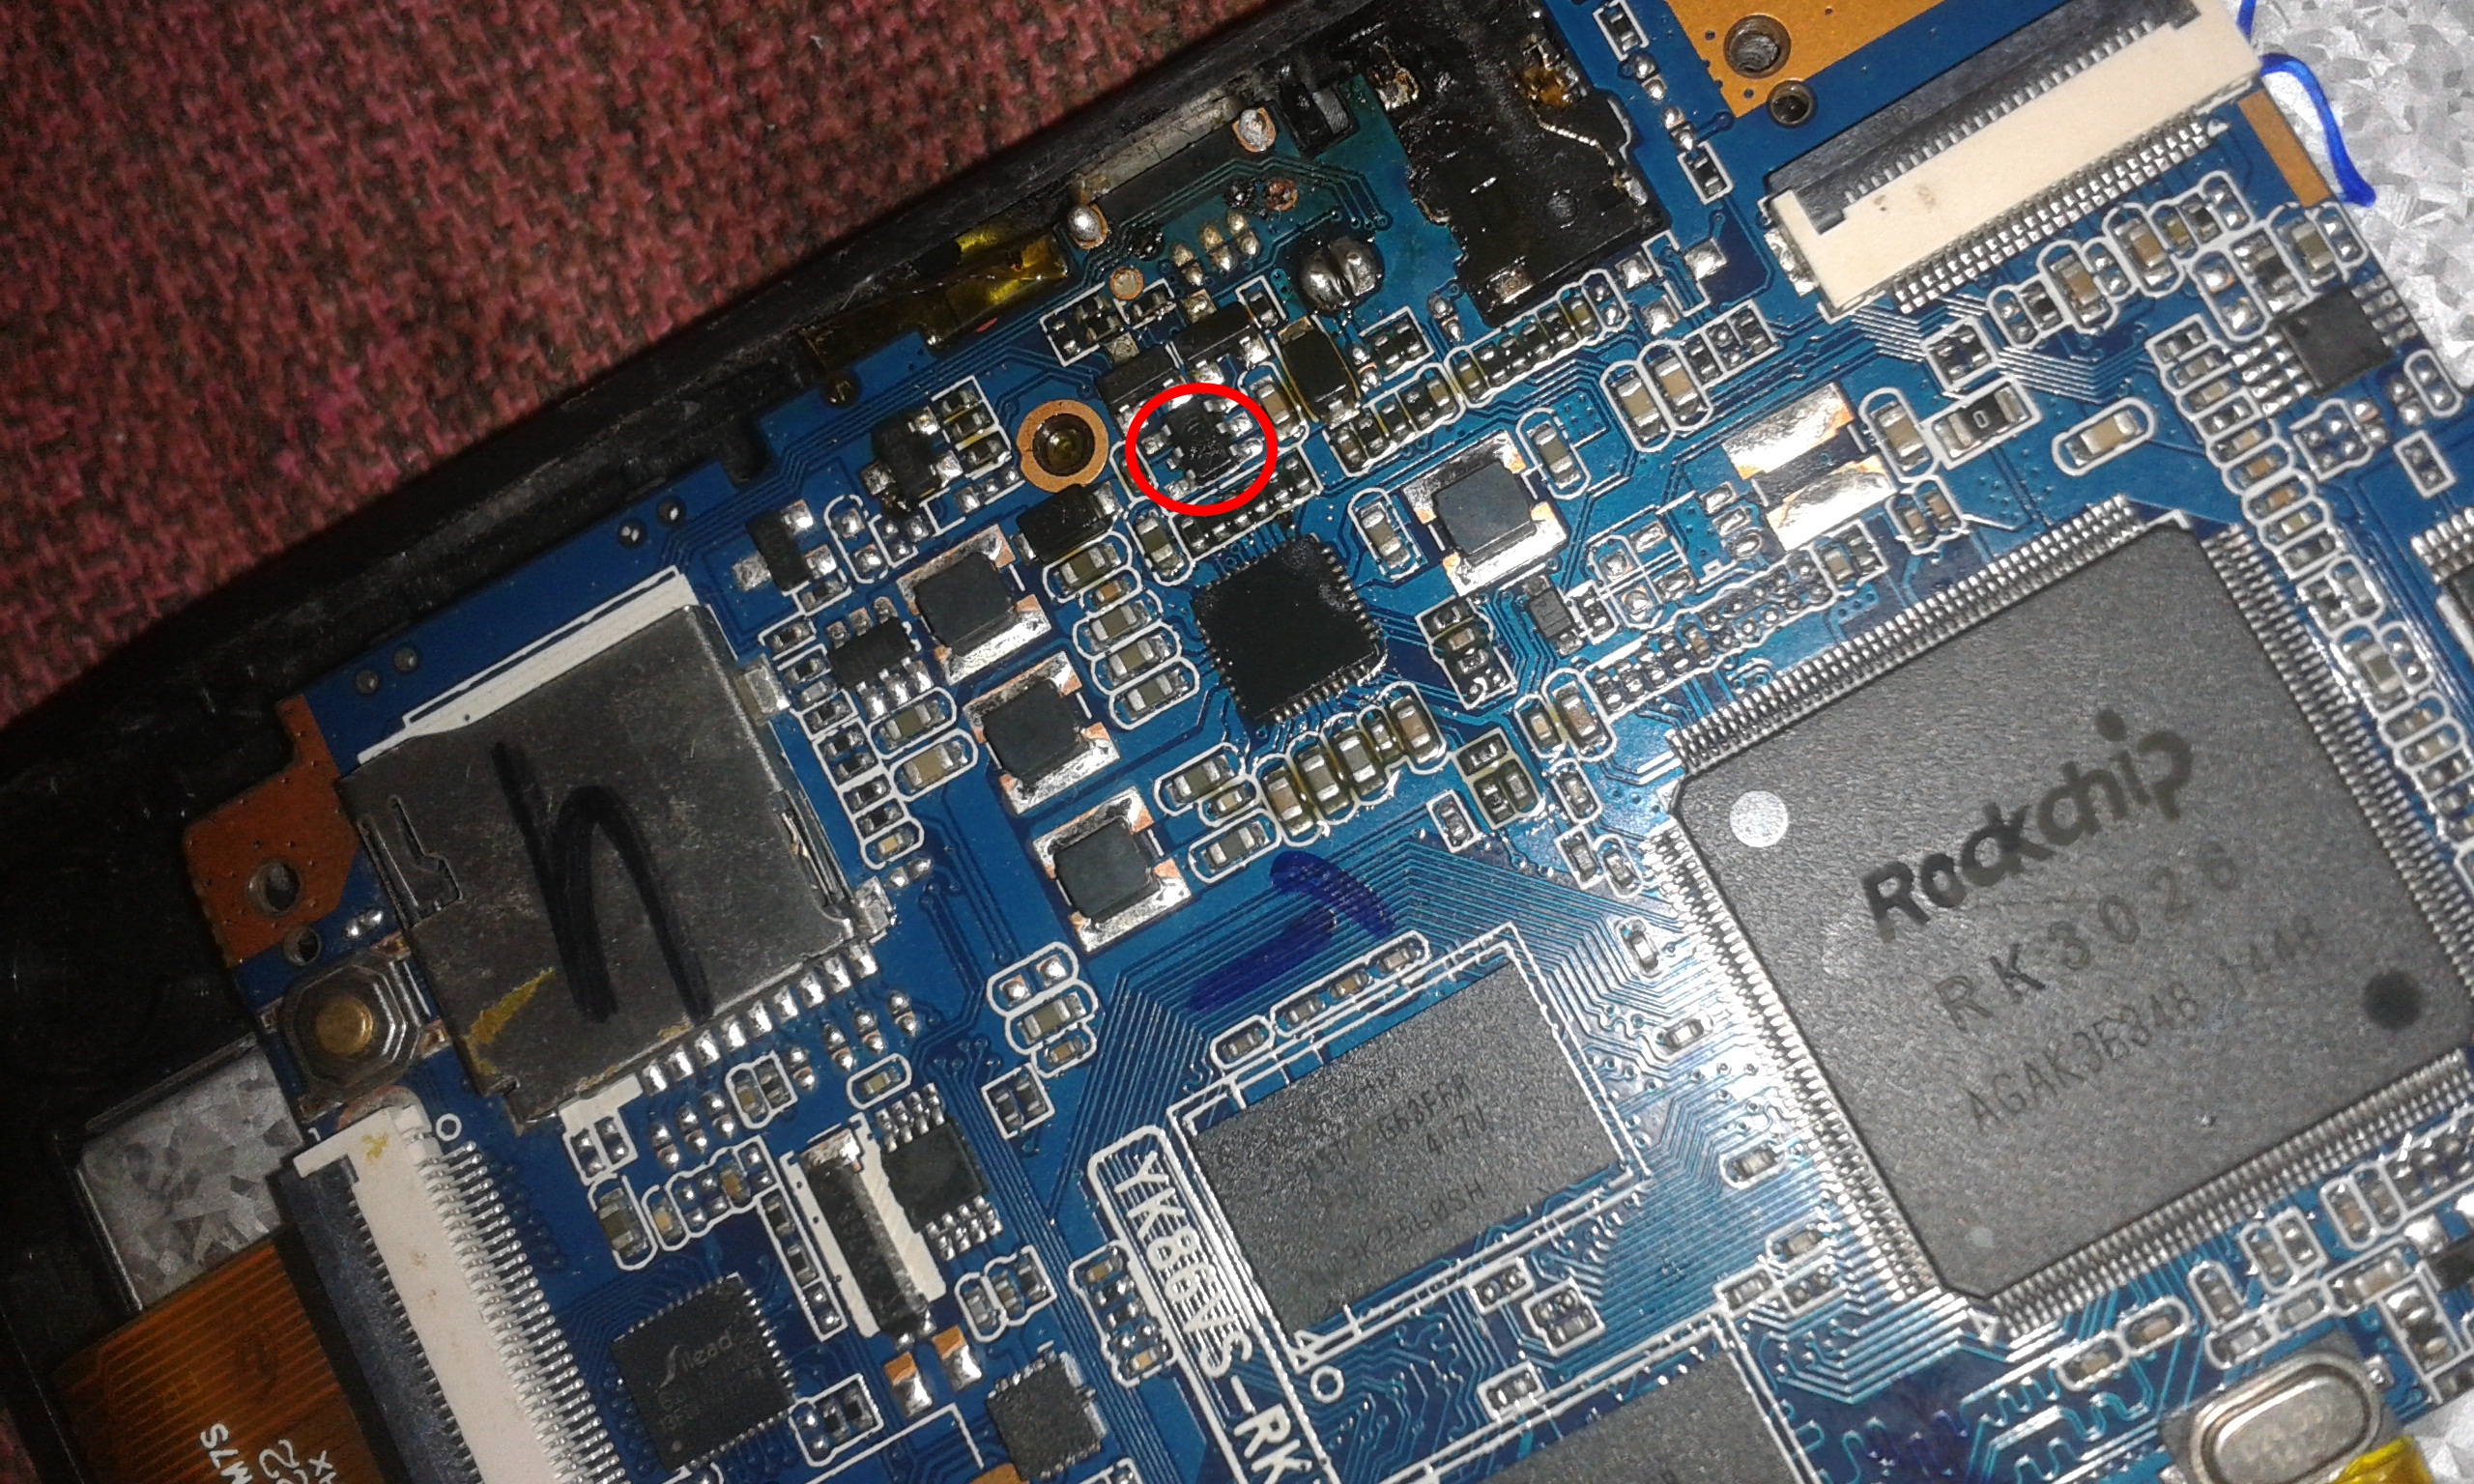
Tablet M7s aparece carregando sozinho e não carrega no carregador, só fica em 11% A solução foi a troca do componente marcado na imagem 1 ponto